
 4106
4106
CallHarbor Messenger is a Premium Feature. To enable, please contact CallHarbor Support.
- Opt-In Status
- Start a New Conversation
- Conversation Filters
- Archive a Conversation
- Delete Conversation
- Conversation Features
Log In
1. Go to CallHarbor Messenger

2. Enter your email address and password associated with CallHarbor Messenger.
Currently, the login is separate from your CallHarbor Portal login.

3. If you do not know your password, please click forgot password and enter the email address associated with your account. If you do not know the email address associated with your account, please contact CallHarbor Support, including:
- Your Name
- Your Company Name
- Your extension

Number Switcher
While SMS numbers can be shared across users, the SMS number must be assigned a primary user. The primary user's name will appear in relation to the shared number. A user can have multiple numbers shared to their account, however, only 1 number can be the "active number" at a time. To send, receive, or view conversations for another SMS number, the active number must be switched.
1. Hoover over your user/the user of the shared SMS number in the upper left-hand corner
![]()
2. This will create a drop-down of all available SMS numbers your user has access to

3. Select the SMS number you wish to make the active number. This will update the portal to display conversations for the SMS number selected. The name in the upper left hand corner will also reflect the name of the primary user assigned the SMS number

Please note:
- Switching to an account with a large number of active conversations or contacts may cause a period of delay where the portal is downloading relevant conversations and contact data to your device.
- When sending a message on a shared number, the user that sent the messsage will be associated with the message so that you can identify who said what inside of a conversation.


Conversations

Active conversations are listed on the left. You may view an individual conversation by selecting it from the list. When viewing an active conversation, there are three types of messages:
Inbound
Inbound messages are left aligned and have a grey background.
Outbound
Outbound messages are right aligned and have a blue background.
Notes
Notes can be entered into a conversation via the API and are meant to be contextual to the conversation, like a voicemail transcription or a note from a CRM / e-commerce system. Notes have a yellow background

Opt-in Status
Each contact has an opt-in status, which defaults to "opted-in." The opt-in status of a contact controls the ability to use automated features of the application including but not limited to:
- Blasts & Contact Lists
- Drip Campaigns
- Reminders


- A contact is opted-out when any one of the following keywords are received: STOP, END, QUIT, CANCEL, UNSUBSCRIBE, OPTOUT
- A contact is opted-in when any of the following keywords are received: START, UNSTOP, SUBSCRIBE, OPTIN
Manually Opt-Out Contact
1. Open the address book.

2. Select the contact to Opt-Out.

3. Check the "Opt-Out" checkbox.
![]()
4. Click "Update Contact Details"
![]()
5. An Opted-Out note will be added to the contact.
![]()
Start a New Conversation
1. Click "New Conversation"
![]()
2. Enter a phone number or select a contact
-
Send to Phone Number
You can send to a phone number by entering it into the "Send to Phone Number:" field and clicking "Start Conversation". -
Choose Contact
Start a conversation with an existing contact by searching or scrolling through the address book and clicking on the contact.

3. A new conversation is started with the phone number entered or the contact selected.

4. Type the message to send in the textbox, then click the paper plane icon or Shift+Enter to send.
Conversation Filters
1. Click the "Filter" button.

2. The available filters control what conversations appear on the left-hand side of the conversations tab

Sort By - Sort conversations by date, name, or number
Read Status - Display unread, read, or all conversations
Archive Status - Display unarchived, archived, or all conversations
Blocked Status - Display Unblocked, blocked, or all senders
Include Unknown Date - Some messages or notes may not include date information as it is imported from an integration. Checking include Unknown date will display the conversations that include messages without date information.
3. The filters are applied when selected. To reset to default filters, click "Reset Filters"
![]()
Archive a Conversation
1. Locate and enter the conversation you wish to archive by clicking the conversation from the left-hand side.

2. Click the "Archive" button.

3. Confirm to archive the conversation.

4. The conversation will now disappear from the conversation list.

Bulk Archive
1. Check the conversations you wish to archive.

2. Click "Bulk Archive"

3. Confirm to archive the conversations.

4. The conversations will now disappear from the conversation list.

Delete Conversation
1. Click the 3 dots to the right of the conversation in the conversation list
![]()
2. This will open a drop-down of actions for the conversation

3. Click "Delete History"

4. Confirm the deletion of the conversation history.

5. The conversation history can also be deleted while in the conversation by clicking the trashcan icon

Conversation Features
Export Message History
1. Select the conversation you wish to export the message history of.

2. Click "Export"
![]()
3. Select the date range and format of the export.

When selecting the date range, only a 30 day range can be entered.

The available formats are .CSV and .HTML

4. Click "Export"

5. The message history is exported and downloaded to your computer.
Add a Note
1. Select the conversation you wish to add a note to.
2. Click "Add Note"
![]()
3. Enter the note into the Note textbox

4. Click the "Save" button

5. The note is added to the conversation in yellow.

Send MMS
1. Select the conversation you wish to send MMS to.
2. Click the "Paper Clip" icon

3. Select the file to attach and enter a caption to accompany the attachment.

4. A preview of the attachment will be displayed once selected.

5. Click "Upload"
![]()
6. The attachment and caption are sent.

Send Canned Response
To learn how to create a canned response, please click here.
1. Select the conversation you wish to send a canned response on.
2. Click the "Double Arrow" icon
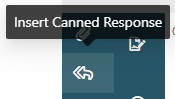
3. Select the canned response to insert.

4. The canned response is added to the message textbox of the conversation. Add any additional information if needed, then send.

Apply Drip Campaign
To learn how to create a drip campaign, please click here.
1. Select the conversation you wish to apply a drip campaign to.
2. Click the "Water Drop" icon

3. Select the drip campaign to apply to the conversation.

4. A preview of the drips will be displayed. If this is the correct drip campaign, select when the driip campaign is applied. If this is not the correct drip campaign, click Go Back and select the correct drip campaign.

5. The available options for selecting when the drip applies are: Now, Delay, and Exact Datetime

Now - the drip campaign will begin when "Apply Campaign" is clicked.

Delay - the drip campaign will begin at the set interval selected. If 1 hour, the drip campaign will begin 1 hour after clicking "Apply Campaign"

Exact Datetime - select the exact date and time for the drip campaign to begin.

6. Click "Apply Campaign"
![]()
7. Confirm to apply the drip campaign.

8. The drip messages will be displayed in the conversation, with a "Scheduled for <date>" status

9. Future drip messages can be edited or deleted

10. Edit will edit the date and time of the scheduled message, not the message body.

11. Delete will delete the scheduled message. The message will no longer be sent. Confirm the deletion of the scheduled message.

Contacts

The Contacts Tab will display a drop down: Contacts and Lists
- Contacts will display the contacts added to active number selected.
- Lists will display contacts lists added to the active number selected
Add a Contact
1. Click "New Contact" from the top right of the app.
![]()
2. Enter the contact details. Required fields are denoted by a red asterisk.

Import Contacts via CSV
1. Click "Import" from the top right of the app.
![]()
2. Import from File
2a. Click "Download Sample" to download a copy of the CSV format used by the portal.

2b. Fill out the contacts you wish to import in the sample file, Full Name and Phone Number are required fields. Save a copy of the contacts to import as a .CSV file

2c. Click the "Choose File" button and select the .CSV file. Skip to step 4 for the next step
- If you included a header row (e.g. "Full Name, Phone, Email"), choose yes for "Does the file have a header row?"

3. Import pasted CSV data
3a. Select Import pasted CSV data

3b. Select Yes or No for "Does the pasted data have a header row?". If the data that will be pasted includes "Full Name, Phone Number, E-mail, Company Name, Title, Notes", select Yes.
3c. Paste the contacts into the Paste Import field
The pasted information must be in .CSV format. Pasted .CSV format utilizes commas to delimit the information.
Example of .CSV format
Full Name,Phone Number,E-mail,Company Name,Title,Notes
Jon Snow,555-333-4444,[email protected],LLC,Boss,Cool Guy
Jane Snow,555-777-9999,[email protected],,,
Example of NON-.CSV format
Full Name Phone Number E-mail Company Name Title,Notes
Jon Snow 555-333-4444 [email protected] LLC Boss Cool Guy
Jane Snow 555-777-9999 [email protected]

4. The contacts entered will be parsed. If all contacts pass the parse, a green checkmark will be present. Click Review Data and Alerts

5. Review the information parsed for the contacts to ensure everything looks accurate and correct

6. Select a List if necessary

7. Click Finalize Import
![]()
8. The number of contacts to import will be listed, as well as if they are new (to Create:) or updating an already created contact (to Update:), and the list, if selected, and the SMS number the contacts will be associated with

9. Click Finish Import
![]()
Edit a Contact
1. Choose the contact that you would like to edit from the list on the left.

2. Next, edit any details, being sure to complete all required fields, denoted by a red asterisk.

3. Click Update Contact Details to save the changes entered.
![]()
Delete a Contact
1. Locate the contact from the contact list on the left.

2. Hover over the "Action" dropdown for that contact.

3. Choose the "Delete" option.

4. You will be prompted with a confirmation that you would like to delete the contact.

Delete All Contacts
There may be a time where you need to delete all contacts for a user, like when reassigning a number or after an import of invalid or unintentional contact data.
1. To delete all contacts, select the gear icon on the top right of the Contacts page to open the Settings modal.
![]()
2. Choose the "Delete" button and you will be prompted to confirm that you would like to delete all contacts. This option CANNOT BE UNDONE.

3. Depending on the size of your contact list, this process may take several minutes and your contact list may refresh several times as it syncs with the server.
Contact Lists
Create a List
1. Click "New List" button on the top right of the screen.
![]()
2. Enter a name for the list and click "Add List"

3. To set auto-subscribe keywords, click on the list to open the Edit details view

4. Enter the keywords to auto-subscribe to the list. When a message is received with a matching keyword, the contact will be added to the list automatically

Edit a List
1. Locate the list that you would like to edit on the left-hand side.
2. Click the list to view the edit details view.

3. After making any changes, be sure to click "Save List Changes"
![]()
Add Contacts to a List
1. Identify and view / edit the list.

2. Click "Add Contacts" to open the contact selection drawer.
![]()
3. Check the checkbox next to any contacts that you want to add to the list.

4. Click "Add Contacts"

Remove Contact from a List
1. Choose the list that you would like to edit.

2. Click the checkbox on the row that contains the contact(s) you would like to delete.

3. Click the trash can icon to delete the selected contacts from the list.
![]()
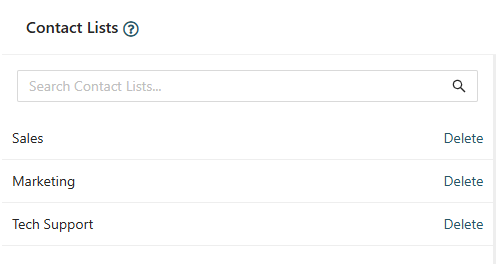
Delete a List
1. Locate the list you would like to delete and choose the "Delete" link on the right.
![]()
2. You will be prompted to confirm the deletion.

Block Senders
Conversation View
1. Open the conversation view with the contact you want to block.

2. Click on the "Block" button.

3. Select "Delete contact and messages" and "Send STOP message" if necessary. Click Block to block the sender
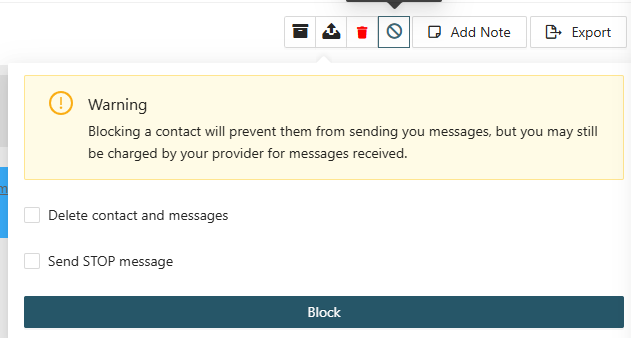
Address Book
1. Go to the address book section.

2. Locate the contact you want to block.

3. Click on the "Block Sender" button.

4. Select "Delete contact and messages" and "Send STOP message" if necessary. Click Block to block the sender

My Profile - Blocked Senders
1. Go to the "My Profile" section.

2. Navigate to the "Blocked Senders" page.

3. Enter the phone number you want to block.

4. Click on the "Block" button.

5. Select "Delete contact and messages" and "Send STOP message" if necessary. Click Block to block the sender

6. The phone number will now be added to your blocked senders list.

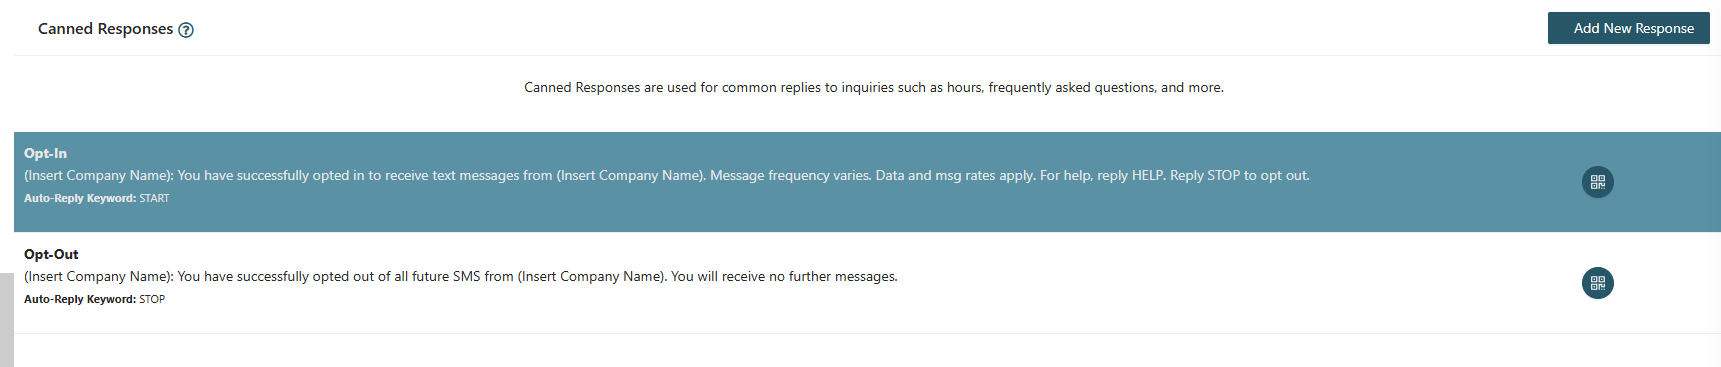
Canned Responses
Canned responses are pre-written messages that you can use as replies to common inquiries, as away messages, and as automatic replies to keywords.
Create/Edit a Canned Response
1. Click "Add New Response" or click on the canned response you wish to edit
![]()

2. Add or modify the canned response details. All required fields are denoted by a red asterisk.
Please note, the (Insert Company Name) is only an example, and the portal will not automatically supply your company name.

3. Click "Add/Edit Canned Response" to save
![]()
![]()
Delete a Canned Response
1. Click on the canned response that you would like to delete from the list to open the edit drawer.
2. Click the "Delete Response" button at the bottom of the drawer. You will be prompted to confirm deletion of the canned response.
![]()
3. Click "OK" to confirm deletion.

Set a Canned Response as an Away Message
1. Create a new Canned Response or click to edit an existing one.
![]()
2. Click the "Is Away Message" switch under message body.

3. On the list view of canned messages. A message icon is visible stating the response is available as a away message.
![]()
Drip Campaigns
Create/Edit a Drip Campaign
1. Click "Create New Campaign" or locate the campaign you wish to edit and click "View" under the "Actions" column
![]()

2. Name the campaign something that will easily allow you to identify the campaign and its contents when applying the campaign.

If "Disable automatic deletion of drips when reply is received" is checked, the drips will continue to send, despite a reply from the customer.
3. Click "Add Drips"
![]()
4. Enter the message into the text area and select the interval.

5. Click "Save"
![]()
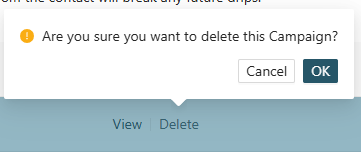
Delete a Drip Campaign
1. Locate the drip campaign that you would like to delete from the list.

2. Click the "Delete" link under the "Actions" column.

3. You will be prompted to confirm deletion of the campaign. Click "OK" to confirm deletion.
Blasts
Blast a message out to multiple phone numbers at once.
Create/Edit a Blast
1. Click "Send New Blast" or locate the blast you wish to edit and click the blast to open the edit view.
![]()

2. Complete all required fields, as denoted by a red asterisk.

Blast Status
- Draft- This will save the blast in a draft state, allowing you to come back and edit it before sending or scheduling in the future.
- Send Now- This will queue the blast up to be sent in the next several minutes.
- Schedule- This option will allow you to choose a timezone, date and time to send the blast.


Compliance Footer
- The Compliance Footer will automatically be appended to the message body. It is recommended that your compliance footer includes identifying information about the sender, a brief explanation as to why you are contacting them (e.g. to discuss order details, appointments, etc.), and how they can opt-out from receiving future communications (e.g. Reply STOP to unsubscribe).

3. Select the List of contacts to send the blast to, or select Custom List to select specific customers


5. Click "Save Blast" for Draft, "Send Blast" for Send Now, "Schedule Blast" for Schedule, and "Edit Blast" for edited blasts

![]()
![]()
![]()
Best Practices
- You should always obtain proper opt-in before sending out marketing campaigns to contacts.
- Identifying your brand and an opt-out option in the compliance footer helps to build trust with your recipients.
- Be mindful of the length and content of your message.
- Avoid content that might be considered spammy.
- Try to avoid using URL shorteners as receiving carriers often block links from popular services like bit.ly or goo.gl.
- Do not send messages related to S.H.A.F.T. (Sex, Hate, Alcohol, Firearms, Tobacco--including cannabis)
Delete a Blast
1. You can delete blasts that are in Draft or Scheduled status. Select the blast that you would like to delete from either the Draft or Scheduled tab.

2. Scroll to the bottom of the edit blast drawer. Click "Delete Blast" to open the confirmation prompt.
![]()
3. Click "OK" to confirm the deletion of the blast.

Reminders
Create reminders to send scheduled messages to individual contacts.
Create a Reminder
1. Choose the date on the calendar for which you would like to schedule the reminder.

2. Click "Create Reminder"
![]()
3. Select a contact as a recipient.

4. Select a timezone and time at which to send the message.

5. Enter your message. Start from a Canned Response will paste the canned response message into the Message text field.

6. Click "Save"
![]()
Edit a Reminder
Please Note: Reminders can be edited or deleted up until their scheduled date/time.
1. Choose the date on the calendar for which the reminder is scheduled for. This will pull up a list of reminders for that date on the right-hand side.

2. Click the reminder that you would like to edit.

3. Edit the desired fields.

4. Click "Update"
![]()
Delete a Reminder
Please Note: Reminders can be edited or deleted up until their scheduled date/time.
1. Choose the date on the calendar for which the reminder is scheduled for. This will pull up a list of reminders for that date on the right-hand side.

2. Click the reminder that you would like to delete.
3. Click the "Delete" button to open the confirmation prompt.
![]()
4. Click "OK" to confirm deletion.

My Profile
Account Details

To update the Full Name or Email associated with your account, please contact CallHarbor Support, including:
- Your Name
- Your Company Name
- Your Extension
- The current Full Name on file in CallHarbor Messenger
- The current Email on file in CallHarbor Messenger
- The new Full Name to be associated
- The new Email to be associated
Change Password

To change your password, enter a new password and confirm the new password. Then click "Update Password"
Messaging Status

Messaging Status allows you to set how often your away message will send and a signature for your outgoing messages.

Away Message Interval (Hours)- The time set here will set the interval for how long the away message will wait before sending another away message to a recipient. By default, it is set to 24 hours.

Enable Messaging Signature - slide the button to the right (blue) to enable a signature for your outgoing messages.

Enter the signature you want added to each outgoing message into the Signature textbox.
Blocked Senders

Please refer to My Profile - Blocked Senders to learn how to block a sender

