
 2894
2894
This article assumes you have been upgraded to our new eFaxing solution. If you are unsure if you have been upgraded, please contact CallHarbor Support, including:
- Your Name
- Your Company Name
- Your Fax Number
- Primary User
- Number Sharing
- Enabled Methods
- Inbound Fax Handling
- Delivery Notifications
- Failure Notifications
Video Tutorial
For a video tutorial of this article, please click here.
Accessing the Fax Portal
eFax is available in the Manager Portal. If you do not know your login for the Manager Portal, please click here.
1. Select the Fax tab.

If you are a Call Center Supervisor or higher, you may need to switch the view of the portal from the entire phone system to your extension only. To do this, click on your name in the upper right-hand corner, then select My Account.

Your Fax Number
Once logged into the portal, your fax number will be listed under the Fax tab.

Multiple Fax numbers may appear if additional fax numbers have been shared with your user.

Shared Fax Numbers will be identified with a Shared tag. The number without a shared tag is the number assigned to your user and will be selected by default when sending.
Send a Fax Via The Portal
Please note, sending a fax via the portal will only allow one attachment to be uploaded. If multiple attachments need to be uploaded, please follow the Send Via Email method.
- Click Send Fax.

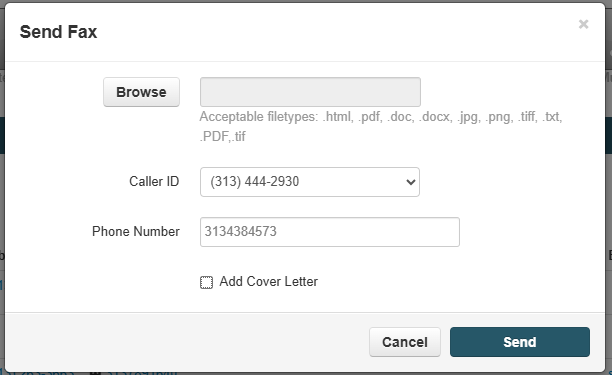
- The Send Fax pop-up window is opened.

- Click Browse to select the file to upload as a fax.
Accepted File Types: .html, .pdf, .doc, .docx, .jpg, .png, .tiff, and .txt
Only 1 file can be selected. Multiple files can be sent using the Send a Fax Via Email method.

- If only 1 fax number is assigned to your user, the fax number will already be selected. If your user has access to multiple fax numbers, select the correct fax number to send out with from the drop-down.


- Enter the Fax Number to send to in the Phone Number field. Only the 10 digits of the fax number should be entered, no formatting.

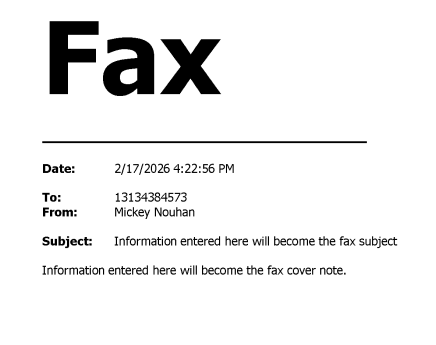
- Add a Cover Letter if necessary. Attached is what the cover letter will look like.


- Once all the information has been entered into the Send Fax pop-up, click Send. Cancel will disregard.

Send a Fax via Email
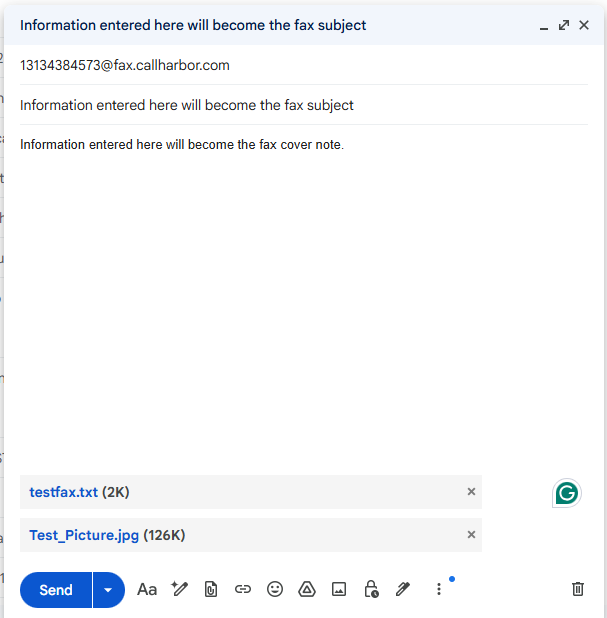
To fax via email, attach your fax to an email and send it to 11digitfaxnumber@fax.callharbor.com
11digitfaxnumber will be 1 followed by the fax number you are sending the fax to (example: [email protected]).
If send notifications are turned on, you will receive a notification verifying that the fax was sent.
Please note:
- A 1 is required at the front of the phone number
- The email MUST be sent from the email associated with your eFax account.
Please contact CallHarbor Support if you are unable to send a fax via email, including:
- Your Name
- Your Company Name
- Your Fax Number
- The Email Address you are using to send
- The Fax Number you are sending to
- Was an attachment added to the email?

Fax Cover Letter
If a subject or body content is included in the email, a Fax Cover Letter will be generated. The Subject entered becomes the fax cover subject, while the body content becomes the note. The recipient information will include the fax number, and use the name associated with your email as the Sender.
Attachments will be appended to the cover letter.
View Your Faxes
The Faxes are separated by Inbox and Sent. By default, the fax tab opens to the Inbox folder.
To switch between the folders, click the Inbox/Sent dropdown located in the left-hand corner and select the folder to switch to.

Inbox
All faxes that have been received by your user will be displayed in the Inbox.

The From is the fax number that sent the fax, and the To is the fax number that received the fax. The To column will appear even if only 1 fax number is assigned to your user.
![]()
The Date and Time the fax was received will be included, as well as the total number of pages in the fax.

Sent

The Sent does not include the From column. We recommend adding a cover letter to faxes if multiple fax numbers are used, as the cover letters will list the sending fax number.
The To column will list the fax number the fax was sent to.

The Date and Time the fax was sent will be included, as well as the total number of pages in the fax.

A fax that is currently being processed and sent will include a Sending badge.

A fax that fails to send will include an Error badge. Hovering over the error badge will supply the error reason.
![]()
A fax that was sent successfully will not include any badge.

Fax Action Icons
Preview the Fax
![]()
Clicking the magnify glass will show a small preview of the fax, this is to help ensure you are downloading the correct fax.


Download the Fax
![]()
Clicking on the down arrow icon will download a copy of the fax to your computer.
Delete the Fax
![]()
Clicking on the X icon will delete the fax from the system. Please note, this action is not reversible. If a fax is deleted from the system, CallHarbor cannot retrieve the fax.
Contacts
To learn about contact administration in the portal, please click here.
Send a Fax to a Contact
Contacts with a fax number added can be selected for faster faxing. To send a fax to a contact:
1. Select the contacts tab.

If you are a Call Center Supervisor or higher, you may need to switch the view of the portal from the entire phone system to your extension only. To do this, click on your name in the upper right-hand corner, then select My Account.
2. Locate the contact to fax.

3. Click the fax number.
![]()
4. The Send Fax pop-up window will open with the contact details included.
Settings
Settings will only affect the main fax number assigned to your user. Any Shared fax numbers will follow the settings of the user the fax number is assigned to as their main.

Primary User

The Primary User is the user that the fax number is assigned to as their main fax number. This cannot be changed without contacting CallHarbor Support.
Number Sharing
Number Sharing allows multiple users to utilize the same fax number to send with. Changes to number sharing can affect the overall company setup of faxing; please consult an Office Manager or CallHarbor Support before making changes.
To allow multiple users to utilize the same fax number to receive with, please contact CallHarbor Support, including:
- Your Name
- Your Company Name
- The Fax Number to be shared
- Extension Numbers of the users to share the fax number
Disabled
![]()
If Number Sharing is set to Disabled, the number is not shared with anyone and can only be used by the primary user.
Everyone

If Number Sharing is set to Everyone, all users have access to send faxes with the fax number.
Users

If Number Sharing is set to Users, only the specified users in 'Share with User(s)' will have access to send faxes with the fax number.
Department
![]()
If Number Sharing is set to Department, the users who belong to the same department have access to send faxes with the fax number. The department selection is only available if the primary user is a part of a department.
Site
![]()
If Number Sharing is set to Site, the users who belong to the same site have access to send faxes with the fax number. The site selection is only available if the primary user is a part of a site.
Enabled Methods

Enabled Methods are the methods for sending faxes that are available to your user. This cannot be changed without contacting CallHarbor Support.
Email - send via Email. For instructions, please click here.
Portal - send via Manager Portal. For instructions, please click here.
ATA - send via a physical fax machine/printer. A device is required to connect the fax machine/printer to our fax portal.
Inbound Fax Handling

Inbound fax handling is how inbound faxes are delivered to you when received.
Email w/Attachment - a notification of the fax received, including a copy of the fax in the email.
Email w/out Attachment - a notification of the fax received, but a copy of the fax will not be included in the email.
Portal - Please do not uncheck Portal. While faxes may still appear in the portal with this unchecked, we cannot guarantee access to the fax if unchecked.
Delivery Notifications

Receive a notification of a successfully sent fax.
Email - a confirmation will be emailed once the fax is sent successfully.
ATA - a confirmation will be printed on the physical fax machine/printer once the fax is sent successfully.
Failure Notifications

Receive a notification of a failed sent fax.
Email - a notification will be emailed if a fax fails to send.
ATA - a notification will be printed on the physical fax machine/printer if a fax fails to send.

