
 3021
3021
This article assumes you are logged into the Manager Portal as a Call Center Supervisor, Site Manager, or Office Manager.
If you do not know your login name or password, please click here or contact CallHarbor Support.
Analytics, Reports, and Settings
What is the Call Center?
The Call Center tab includes a list of call queues and agents, an active calls graph, a link to Analytics if enabled, and reports.
You can manage agent status, transfer calls waiting in the queue, and view the stats for call queues and agents.

Call Queues
The first table in the left-hand corner is the Call Queues table. This table gives you an overview of all current call queues in your system, including the number of active calls, callers waiting in the queue, the average wait time, and the number of idle agents not currently on a call.

Active Calls
Clicking on the number of Active Calls (even if it's zero), displays the call information in real-time: the number the call originated from, the number that was dialed to enter the queue, the status of the call, the assigned agent, and the current duration of the call since it entered the queue.

Callers Waiting
Callers Waiting displays the caller ID the call is originating from, the name of the caller (if available), the status of the call (such as "talking", "ringing agent"), and the current duration/time the caller has been on hold.
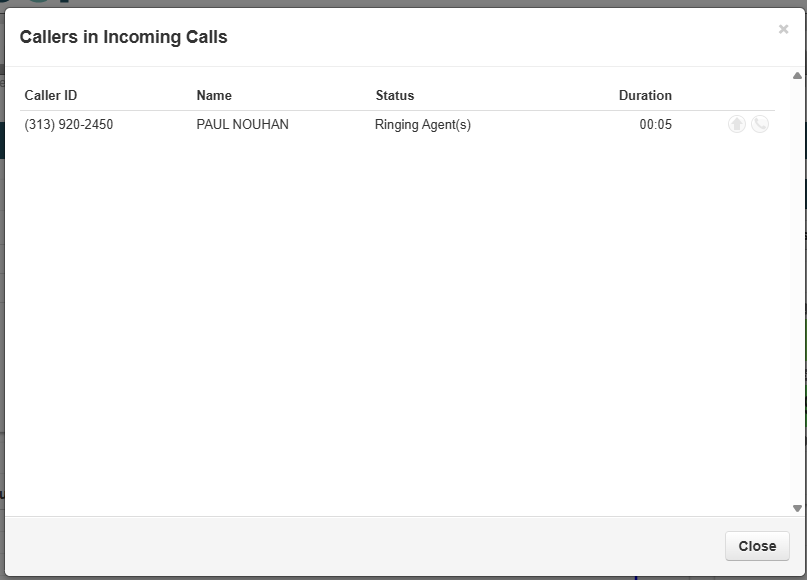
Clicking the Up Arrow icon will move the call to the top of the list with a priority tag. If multiple calls are moved up for priority, the calls will be in order of longest duration.

Clicking the Phone icon will give the option to pick up the call or transfer the call.


Pick Up Call
To send the call to one of your registered devices, select Pick up Call

Select the device to send the call to

Web Softphone - the web softphone must actively be opened on the computer to properly receive the call
Desk Phone - the desk phone will show as the Model of the phone, for example Yealink SIP-T54W
Mobile App - the mobile app will be displayed as either Acrobits SIPIS or CallHarborUC
Select Pick Up

Transfer Call
To send the call to another extension, select Transfer call

By default, Agents in this queue will be selected option for transferring. There are three options: Agents in this queue, All Agents, and Coworkers


Agents in this queue will only find matches for agents that are a part of the call queue from which the call is being transferred from


All Agents will find matches for any agents in any call queue. If an extension is not a part of a call queue, the extension will not show.


Coworkers will match any extension in your system

Once the extension is entered, select Transfer

Wait
The time a caller has been waiting in a call queue will be displayed under the Wait column.

Agents Idle
Clicking on the person icon will allow you to edit the agents in that call queue, either adding more or removing some.

For instructions on adding, editing, or deleting agents, please click here.
Clicking on the pencil icon will allow you to edit the settings for the call queue.

For instructions on editing call queues, please click here.
Clicking on the 'Call Queues >>' link at the top of the table will bring you to the Call Queues menu page.
![]()
For more information regarding call queues, please click here.
Active Calls Graph
The Active Calls Graph is the second table on the lefthand corner of the Call Center reports page. The Active Calls Graph shows the activity of your phone system's call queues in the last 8 hours. 
Hovering over the lines of the graph will display a popout including the time as well as the number of active calls that took place in the call queues.

To view a graph for a specific call queue, check the queue(s) in the Call Queue window pane, and the graph will update to display only the selected queues

Multiple Queues selected will add different colors for each queue

Analytics, Reports, and Settings
The analytics button opens up the Live Analytics Wallboard. To learn more about the Live Analytics Wallboard, please click here.
The reports button opens the reporting window, and includes a dropdown to schedule emailed reports. To learn more about Call Center Reports, please click here.

The settings icon will open a pop-up window labeled Call Center Settings.
General Settings

The Service Level Agreement determines if a call was answered in an acceptable amount of time (seconds). This is used when calculating the Service Level stat. The higher the acceptable answer time, and/or the faster your agents answer before the acceptable answer time, will affect your overall service level positively, but the lower the acceptable number and/or the slower your agents answer, will affect your overall service level negatively.
Custom Statuses

Custom statuses can be created for agents to select. There is a maximum of 8 custom statuses that can be added. Each status can be no longer than 20 characters. Remember that all custom statuses indicate that the user is "offline" on reports.
To add a custom status, enter the name for the status in the textbox then click the Plus arrow.

Once all necessary statuses are created, click Save. Cancel will disregard.
Stats Grid
The stats grid provides a look into how the call queues are performing based on the threshold set for each stat.

There are 8 stats available for the stats grid: Callers Waiting (CW), Average Wait Time (AWT), Average Handling Time (AHT), Service Level % (SL), Abandon Rate % (ABN), Calls Answered (CA), Call Volume (CV), and Abandoned Calls (AC). Turning a stat on or off will change the number of stats displayed in the Stats Grid.
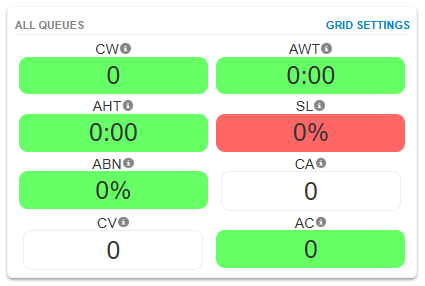
Green = the value is below the lower threshold
Yellow = the value is at or above the lower threshold and below the upper threshold
Red = the value is at or above the upper threshold
|
CW (Callers Waiting) |
The active number of callers waiting in the selected call queue. If no queue is selected, all call queues are represented. |
|
AWT (Average Wait Time) |
The average time a caller spent in the call queue before being dispatched to an agent. |
|
AHT (Average Handling Time) |
This time includes Talk Time, Hold Time, and Disposition Time. |
|
SL (Service Level) |
This is the ratio of calls meeting the service level agreement that is configured under the stats grid settings >> general tab. |
|
ABN (Abandon Rate) |
This is the percentage of calls abandoned, over the total calls offered. |
|
CA (Calls Answered) |
This is the number of calls answered by all agents in the call queue. |
|
CV (Call Volume) |
This is the number of calls originating in the call queue, including abandoned calls, answered calls, voicemails, and forwards. |
|
AC (Abandoned Calls) |
This is the number of calls where the caller hangs up while on hold in the call queue before the call has had a chance to ring to agents in the call queue. |
All stat options, aside from Service Level Percentage, have a Lower Threshold and an Upper Threshold. The Lower Threshold is the limit when the stat grid option will turn from green to yellow. This limit should be less than the Upper Threshold. The Upper Threshold is the limit when the stat grid option will turn from yellow to red. The thresholds are great for making sure your callers are happy and answered fast, as the lower the averages or waits, the better the stat, and when they hit above where you want, it is noticeable.


If the Stats Grid thresholds are not configured, then the grid will default to the following behavior:
- Lower thresholds are 0 (blank) and will color-code as yellow when they reach 70% of the default upper threshold value.
- The CW (Callers Waiting) upper threshold is 5.
- The AWT (Average Wait Time) upper threshold is 60 (seconds).
- The AHT (Average Handling Time) upper threshold is 240 (seconds).
- The ABN (Abandon Rate) upper threshold is 15 (percent).
- CA (Calls Answered) and CV (Call Volume) do not have default upper thresholds and will color-code as white, no matter the number of calls answered or the call volume.
Agents
In the lower right-hand corner of the Call Center page is the Agents Status list. All extensions added as agents in a call queue are included in the list by first and last name. The icon to the left of the agent's name is a status indicator.

Green - Available

Red - On a Call

Grey - Offline

Agents can be sorted by Online (Status), Extension, Last Name, or First Name. To change the sort, select the blue dropdown under 'Agents >>', the text will change based on sort selected.

Clicking the 'Agents >>' button will bring you to the Agents menu page.
![]()

