4216
4216
Login
Once you initially open the app you will be presented with a Sign In page, please utilize the same login used for the Manager Portal to log into the app, if you are unsure of your login please reset your login or contact CallHarbor Support for more assistance.
iOS: Android:

The app will ask for you to allow permissions one at a time. Please Allows Notifications. Contacts do not need to be enabled if you do not need access to your phone's native contacts.
If you are using iOS, please make a call with the app to enable Microphone access.
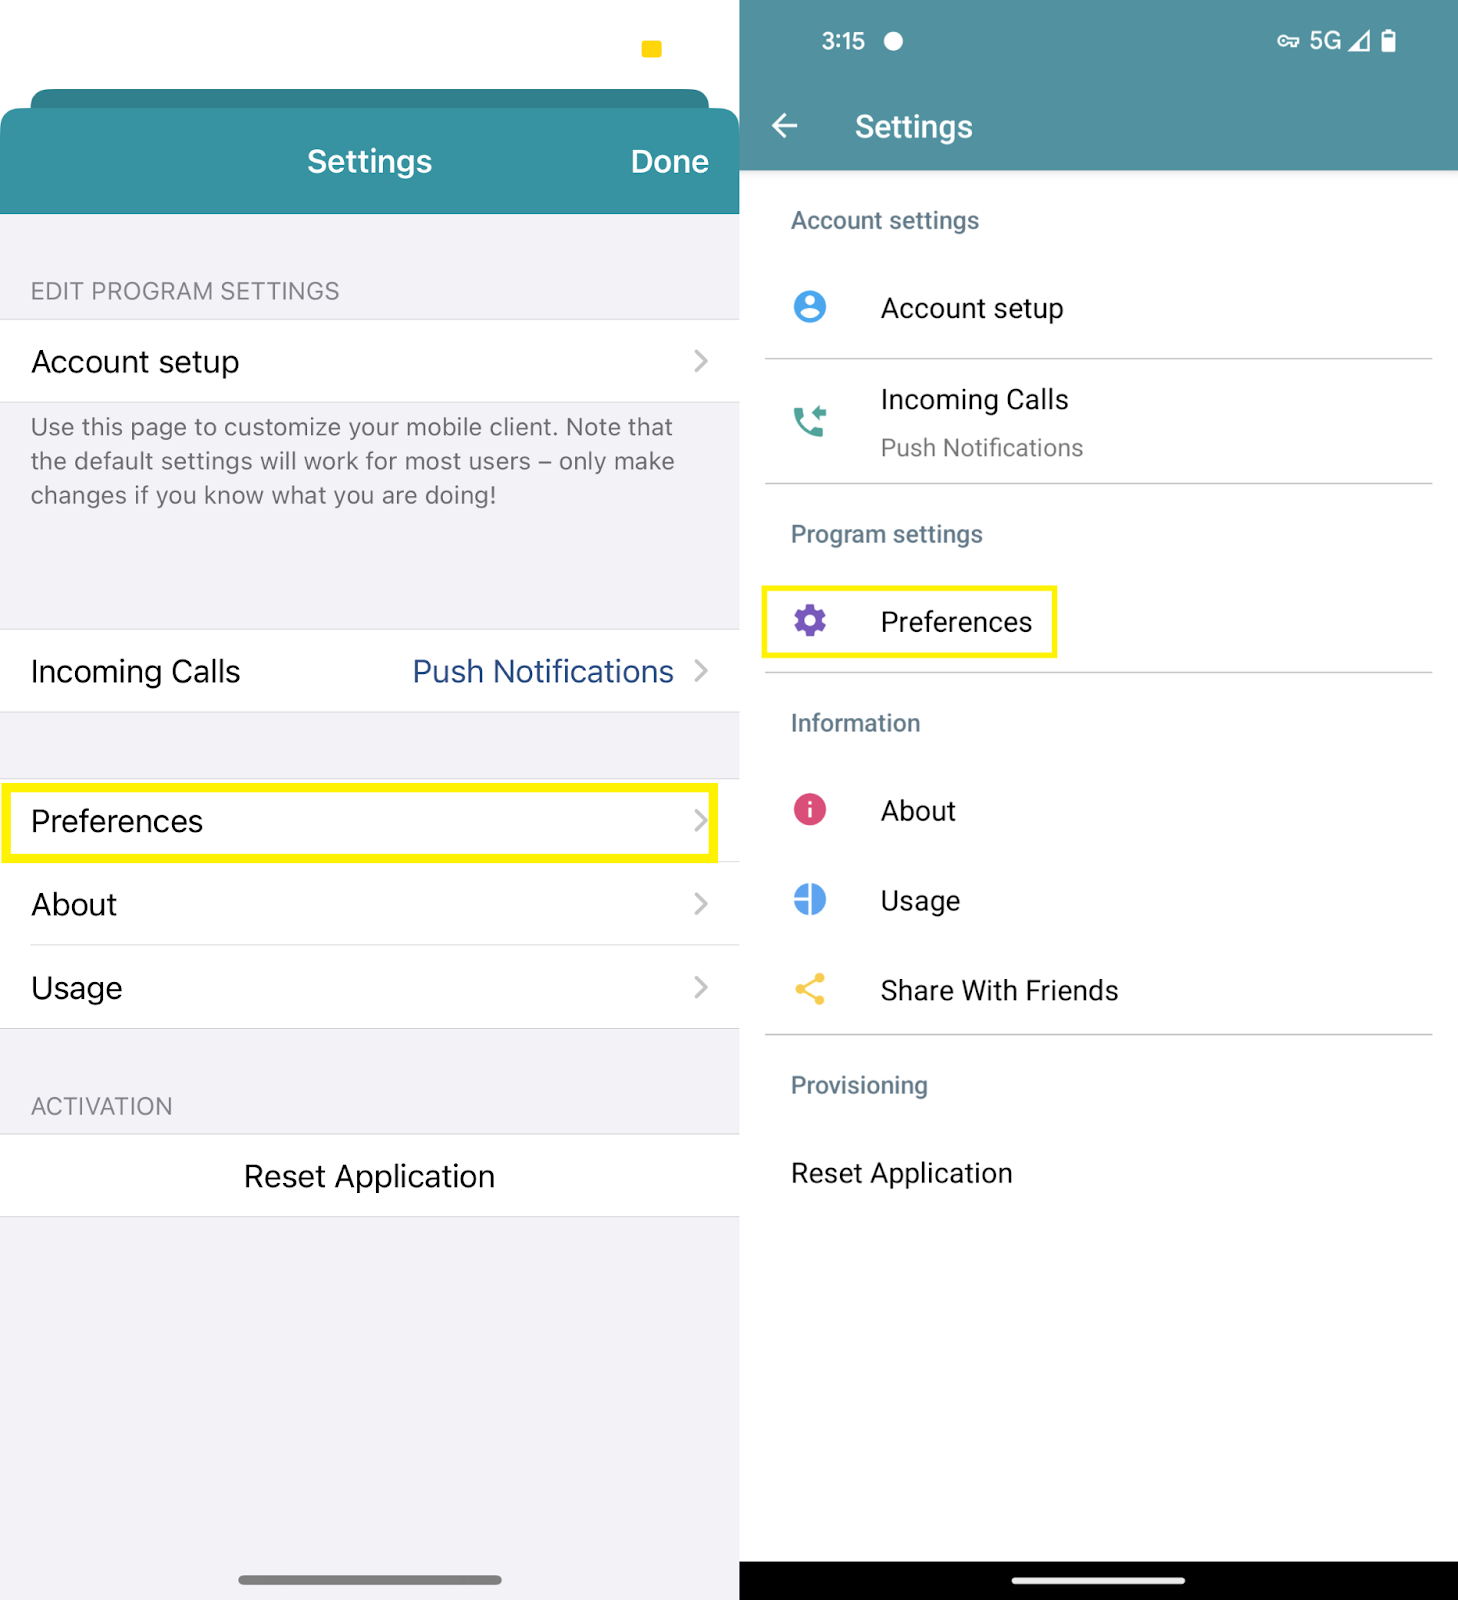
Enable SIP Logs
To allow CallHarbor Support to better assist you if any issues arise with the app, please enable SIP Logs.
iOS (left side): Click the 3 dots in the corner
Android (right side): Click the 3 dots in the corner and tap "Settings"
iOS (left side): Select Preferences
Android (right side): Select Preferences
iOS (left side): Turn On "Log SIP traffic"
Android (right side): Turn On "Log SIP traffic"
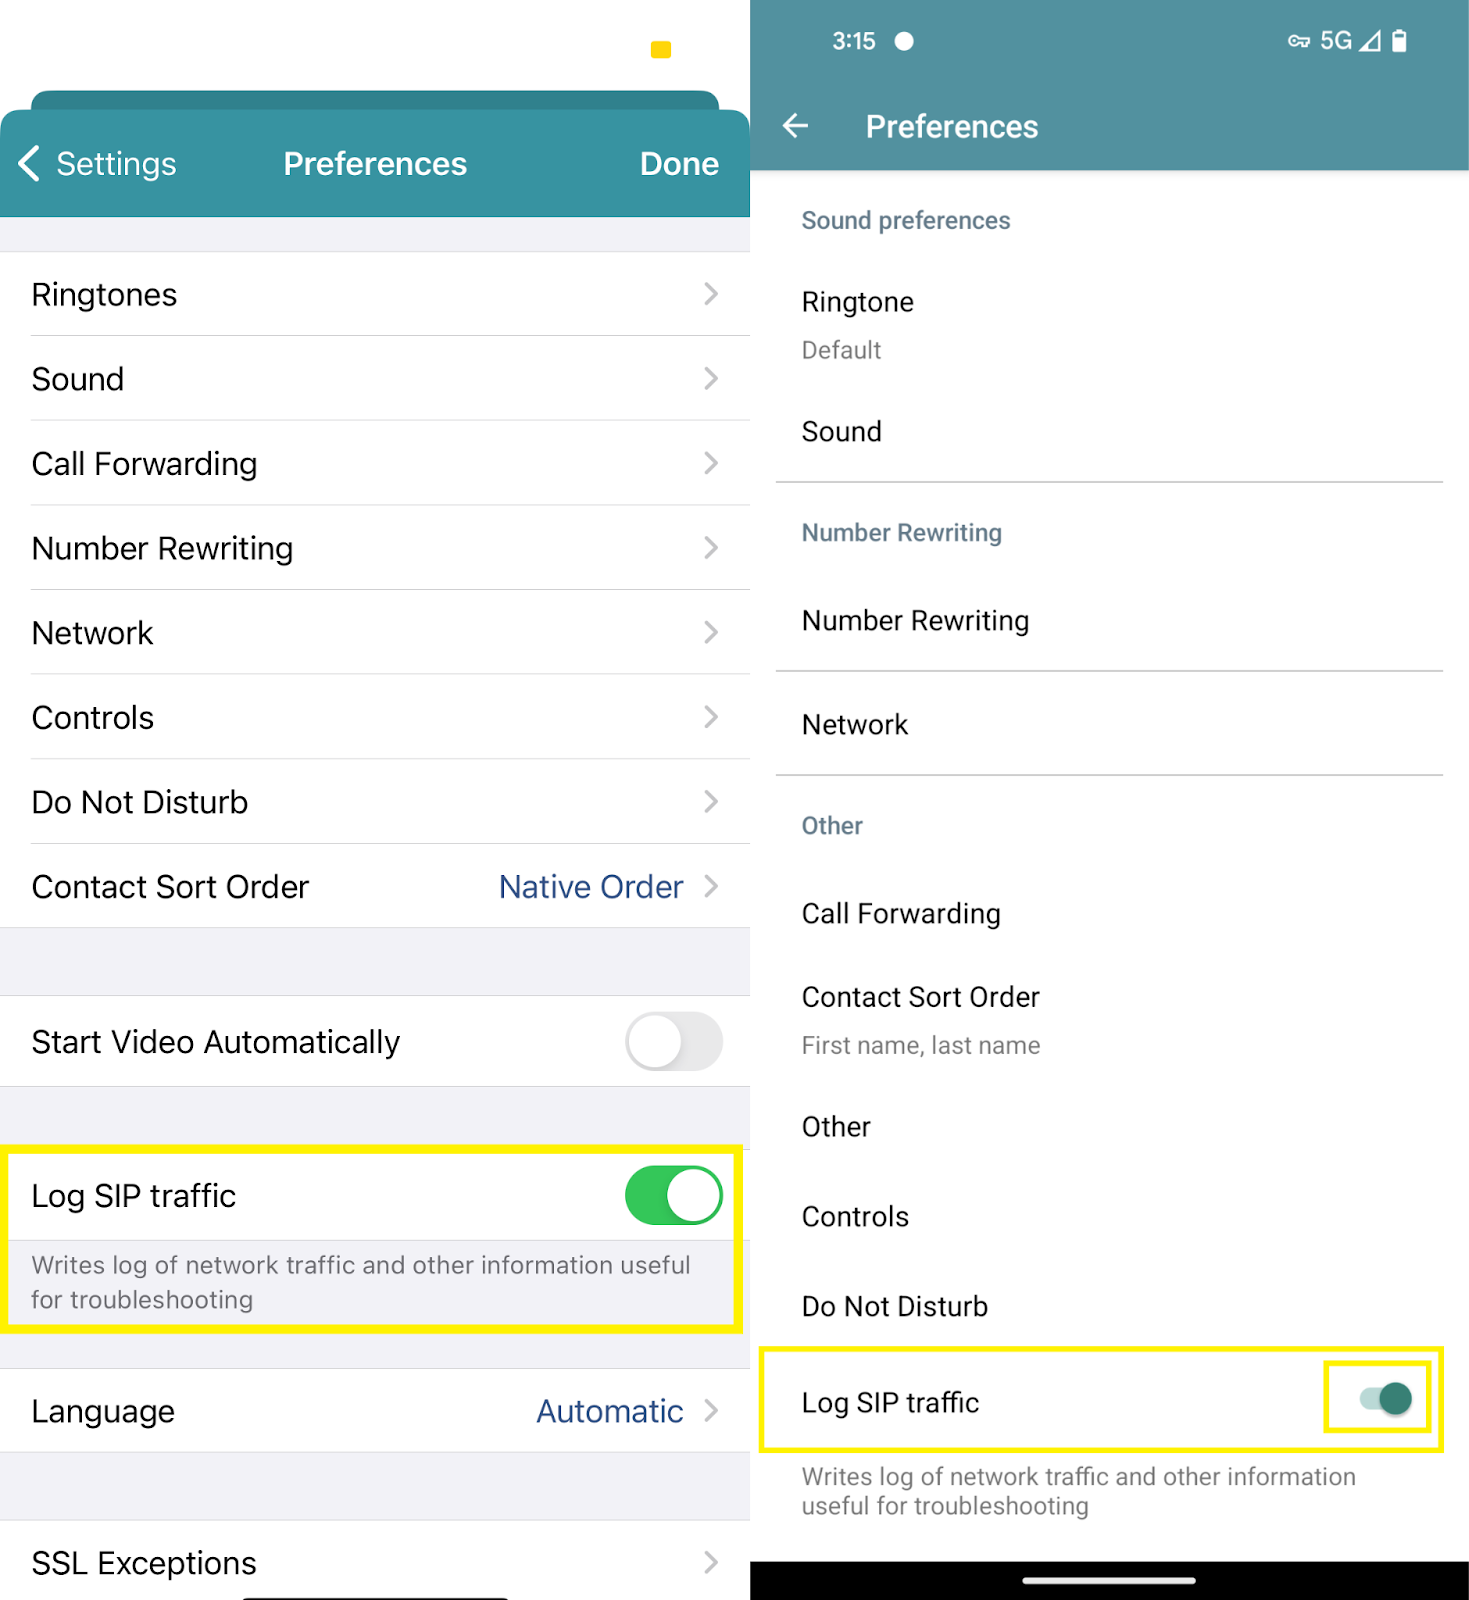
iOS (left side): Click Done, and there will be a new section in the settings:
Android (right side): Click the back arrow, and there will be a new section in the settings:

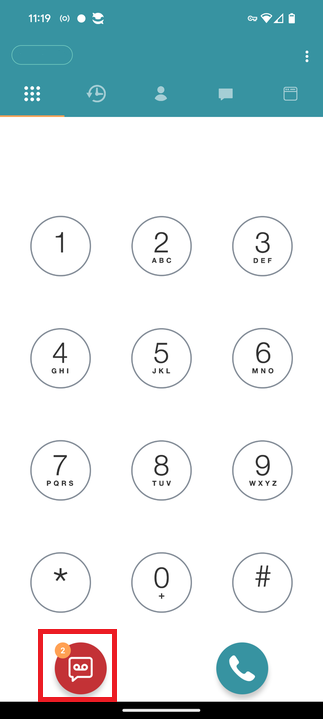
Dial Pad Tab
From this page, you can dial a specific number and make calls.
To delete or backspace, use the red arrow.
iOS: Android:


Once within a call, the app will transition to the active call screen. From this screen, you may utilize many functions such as:
Note that the video function will only occur when on a call from extension to extension, where both users are using the CallHarborUC app.
Hold
Places a caller on Hold
iOS: Android:

Mute
Mutes your microphone, the caller cannot hear you
iOS: Android:

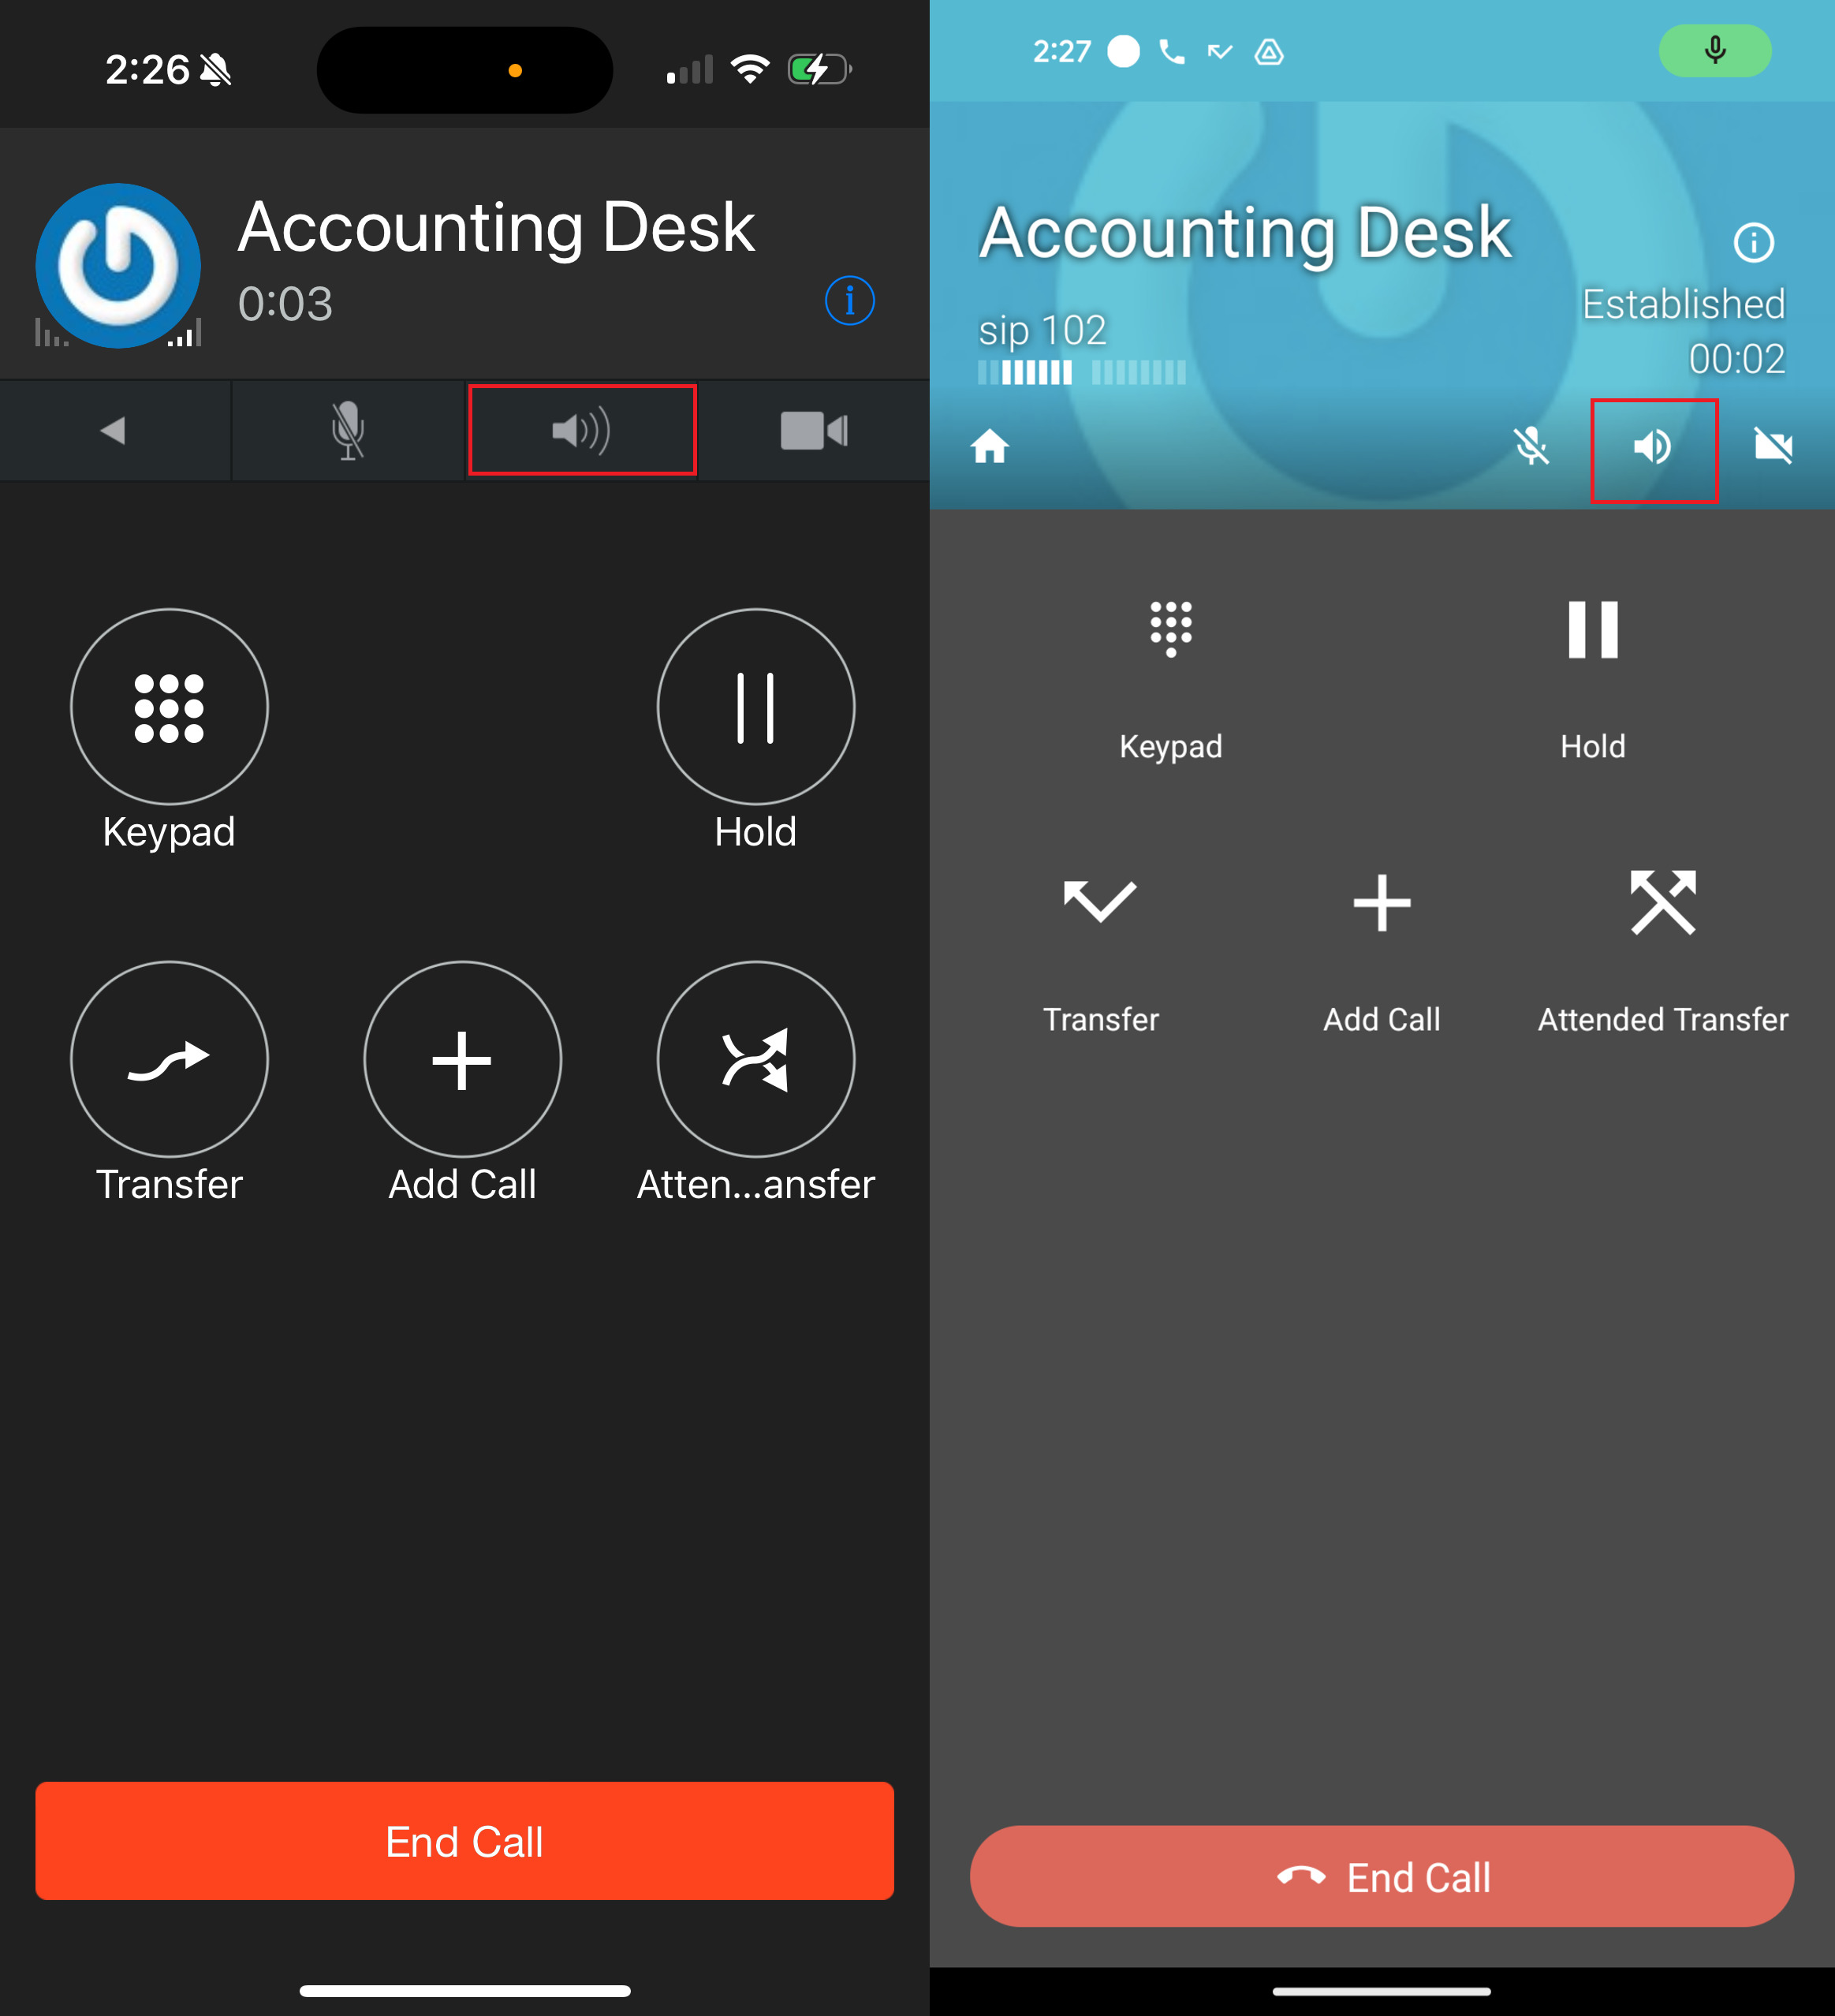
Speaker
Uses the speakerphone to play the audio of the call
iOS: Android:
Transfer
Transferring a call can be completed by pressing the transfer button, and then dialing the extension you would like to transfer the call to. Once you have dialed the extension you must press the call button on iPhone to complete the transfer, or the transfer button at the top right on Android to complete the transfer.
iOS: Android:

![]()
These steps will complete a Blind Transfer.
For steps on completing Attended Transfer, please click here.
Add a Call
Conference additional numbers into the call
iOS: Android:

This will bring you back to the dial pad *Back to Call* should be at the top. Enter the extension or phone number you wish to add to the call, then press the Call Button
iOS: Android:


Once the call is answered, press Join
iOS: Android:


The Calls will be merged together. Use Split to unmerge the calls
iOS: Android:


If you split the calls, both calls will be placed on hold, and you will be returned to the second call. To switch between the calls, press the arrows circling each other
iOS: Android:


Video
This function only works for calls from extension to extension, and both extensions are using the CallHarborUC app for the call
iOS: Android:


Select the Front or Back Camera to be used. You may receive a permission popup to approve access to your camera. Camera Access is needed for this function to work
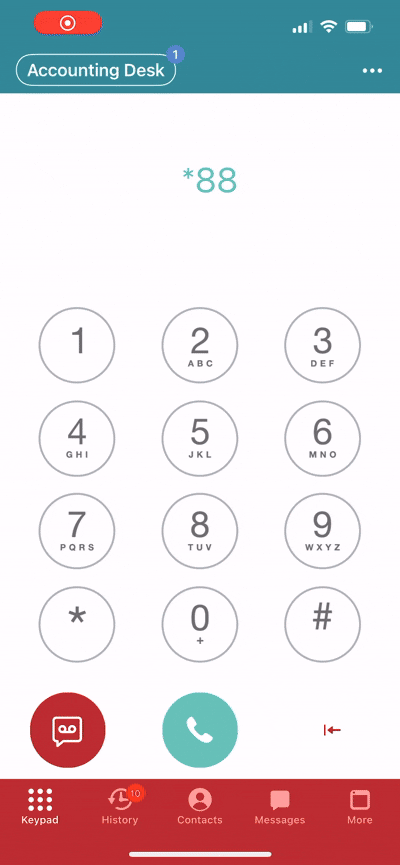
Move Call from Another Device
If you are on a call on another CallHarbor device, such as the web softphone or a physical desk phone, you can move the call to your mobile app by dialing *88
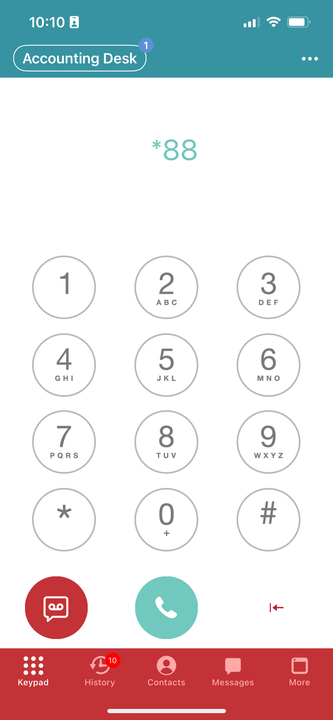
The caller will not be placed on hold during the move from one device to another. After dialing *88, the mobile app will update to display the caller ID of the call pulled.
Call History Tab
In the call history tab, you can view incoming, outgoing, and missed calls.
iOS: To filter to "Missed Calls", tap "Missed"
Android: To filter to “Missed Calls,” tap the “All Calls” text on the top right and select the “Missed Calls” option.
iOS: Android:

iOS: For instructions on disabling CallHarborUC calls from showing in your iPhone call history, please click here.
For information on sending SMS from the Call History tab, please click here.
Contacts Tab
From the contacts tab, you can view either your personal contacts* from your cell phone or your work contacts.
To switch between the two:
iOS: Tap Address Book at the top of the contacts screen
Android: Tap on the “Company” text on the top right and select “Address Book” from the drop-down menu.
Note: If you would like to view your personal contacts to make phone calls to them via the app, the “Contacts” permission must be enabled.
iOS: Android:

Contacts cannot be added through the mobile app. To add contacts for your extension, please click here.
Messages Tab
To send a text message, hit the green circle at the bottom right of the screen (Android) or the pencil and paper icon in the top right (iOS), then either enter the phone number(s) and/or select a contact(s), and then tap in the blank box at the bottom of the screen to enter the message you would like to send. Hit the send button to the right when ready.
iOS: Android: iOS: Android:

For detailed instructions on sending SMS, please click here.
Settings Tab
The settings tab contains the “Visual Voicemail” to view your voicemail, and the “User Settings” submenu. The “User Settings” tab contains:
- Changing the answer rules priority
- Enabling/disabling voicemails
- Recording voicemail greetings
- Other voicemail settings
iOS: Android:

Voicemail
Visual voicemail gives you the ability to view voicemail transcriptions, listen to voicemails, forward, save, and delete voicemails.
Note: To view voicemail transcriptions, voicemail transcription must be enabled, which can be done from the “User Settings” menu. If transcription is enabled for your extension but is still not showing, please contact CallHarbor Support.
iOS: Android:

To switch between the different Voicemail folders, select the dropdown located in the upper left-hand corner

Voicemail Message
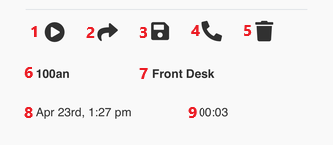
- Play the voicemail message
- Forward the voicemail message to another extension
- Save the voicemail message, moves the message to the Saved folder. Only available in New and Trash
- Call the number that left the voicemail
- Delete the voicemail message
- The caller ID number that left the voicemail message
- The caller ID name that left the voicemail message
- The date and time the voicemail message was left
- The duration of the voicemail message
If you use the Voicemail button from the dial pad, you will be connected to the voicemail system via a call. You will need to enter your voicemail pin in order to access the system.
iOS: Android:

For instructions on navigating the voicemail system, please click here.
User Settings
The user settings page allows you to adjust your answering rules (reorder them), as well as change voicemail settings and greetings.
Note: Adjusting your answering rule priority may affect how your phone rings, including your desk phone.
iOS: Android:

Answering Rules
Clicking reorder will show all of the created answering rules for your extension, displaying the timeframe that is used for the answering rule. The rule that appears in Reorder is the active rule that will be followed. If you are unsure of what your answering rules are, please click here.

Click Save after selecting the new Answering Rule
Greetings
Play the Current Greeting
1. Click the Play button

Select a Different Greeting
1. Click on the drop-down under Greetings

2. Select the new greeting to be the active greeting by clicking the greeting

3. Click Save after selecting the new Greeting

Record a New Greeting
1. Click the 'speaker icon'

2. The screen will update to include 'Add Description' and 'Choose Device'.

3. Enter a name for the greeting and select the device to call

The available devices will be devices registered to your extension. A device ending in WP will be the web softphone and a device ending in IP or AN will be the CallHarborUC app. Devices without a suffix are usually assigned as your physical desk phone.

4. Click Call Me

5. The call will be made to the device selected.
When the call connects, you will be asked to start recording after the tone and press # to save.
The call will end after pressing #, and the voicemail greeting will be saved.
6. Refresh the User Settings tab

7. Select User Settings again if necessary.
8. The new greeting will be available in the app. Click the new greeting to select it.

9. Click Save after selecting the new Greeting
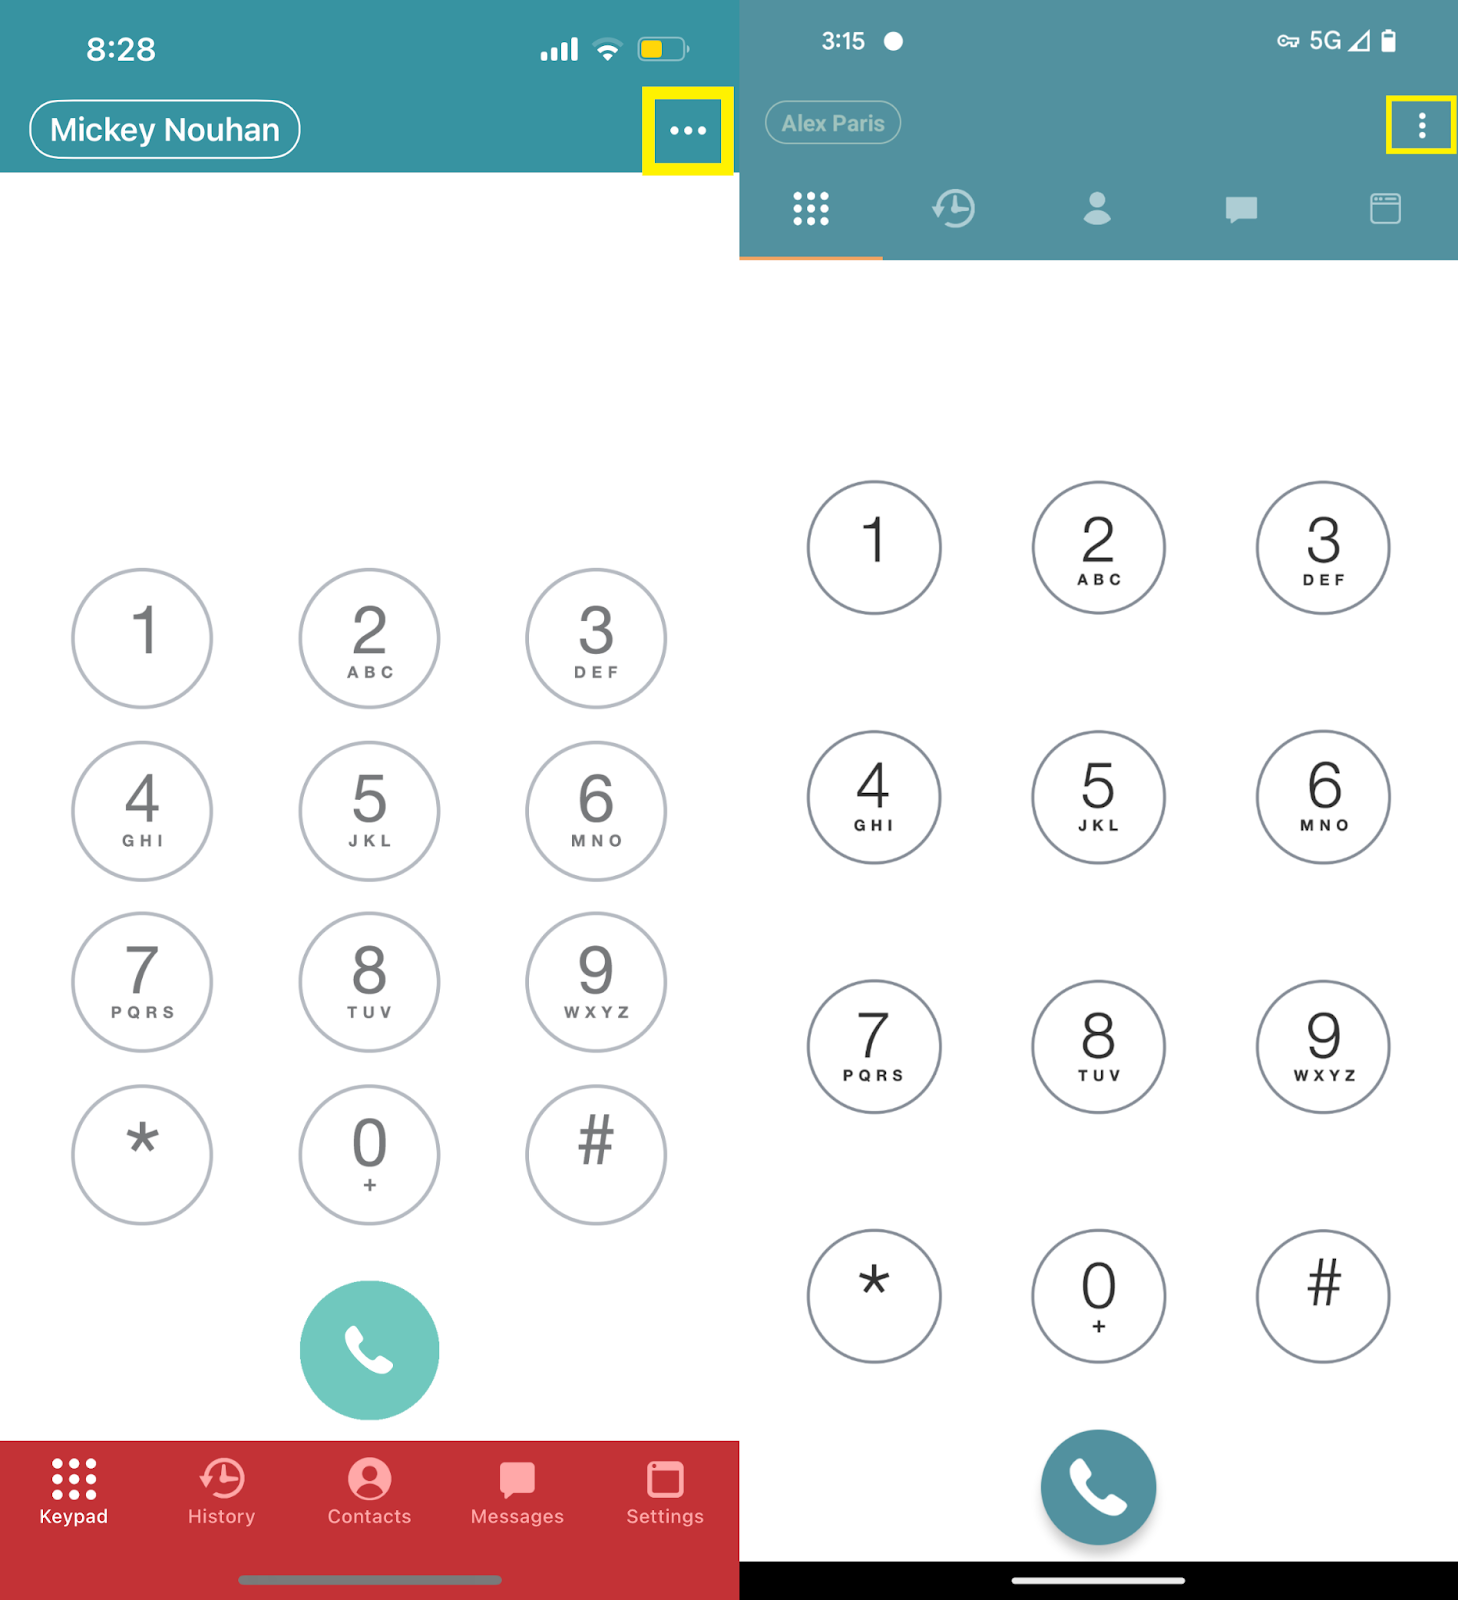
App Settings
This page can be accessed by pressing the three dots at the top right hand side of the application (hamburger menu).
This page is to be utilized for changing app-specific settings, as well as managing advanced features of the app.
It is suggested that you work with a CallHarbor support representative prior to making any adjustments within this page.
If you need to logout of the application you may do so from this page by choosing reset application.
iOS: Android:


iOS: Stop Calls from Appearing in your Cellphone Call History
1. Press the Three Dots in the upper-righthand corner
2. Select Preferences

3. Select Controls

4. Disable 'Includes Callkit calls to Recents'


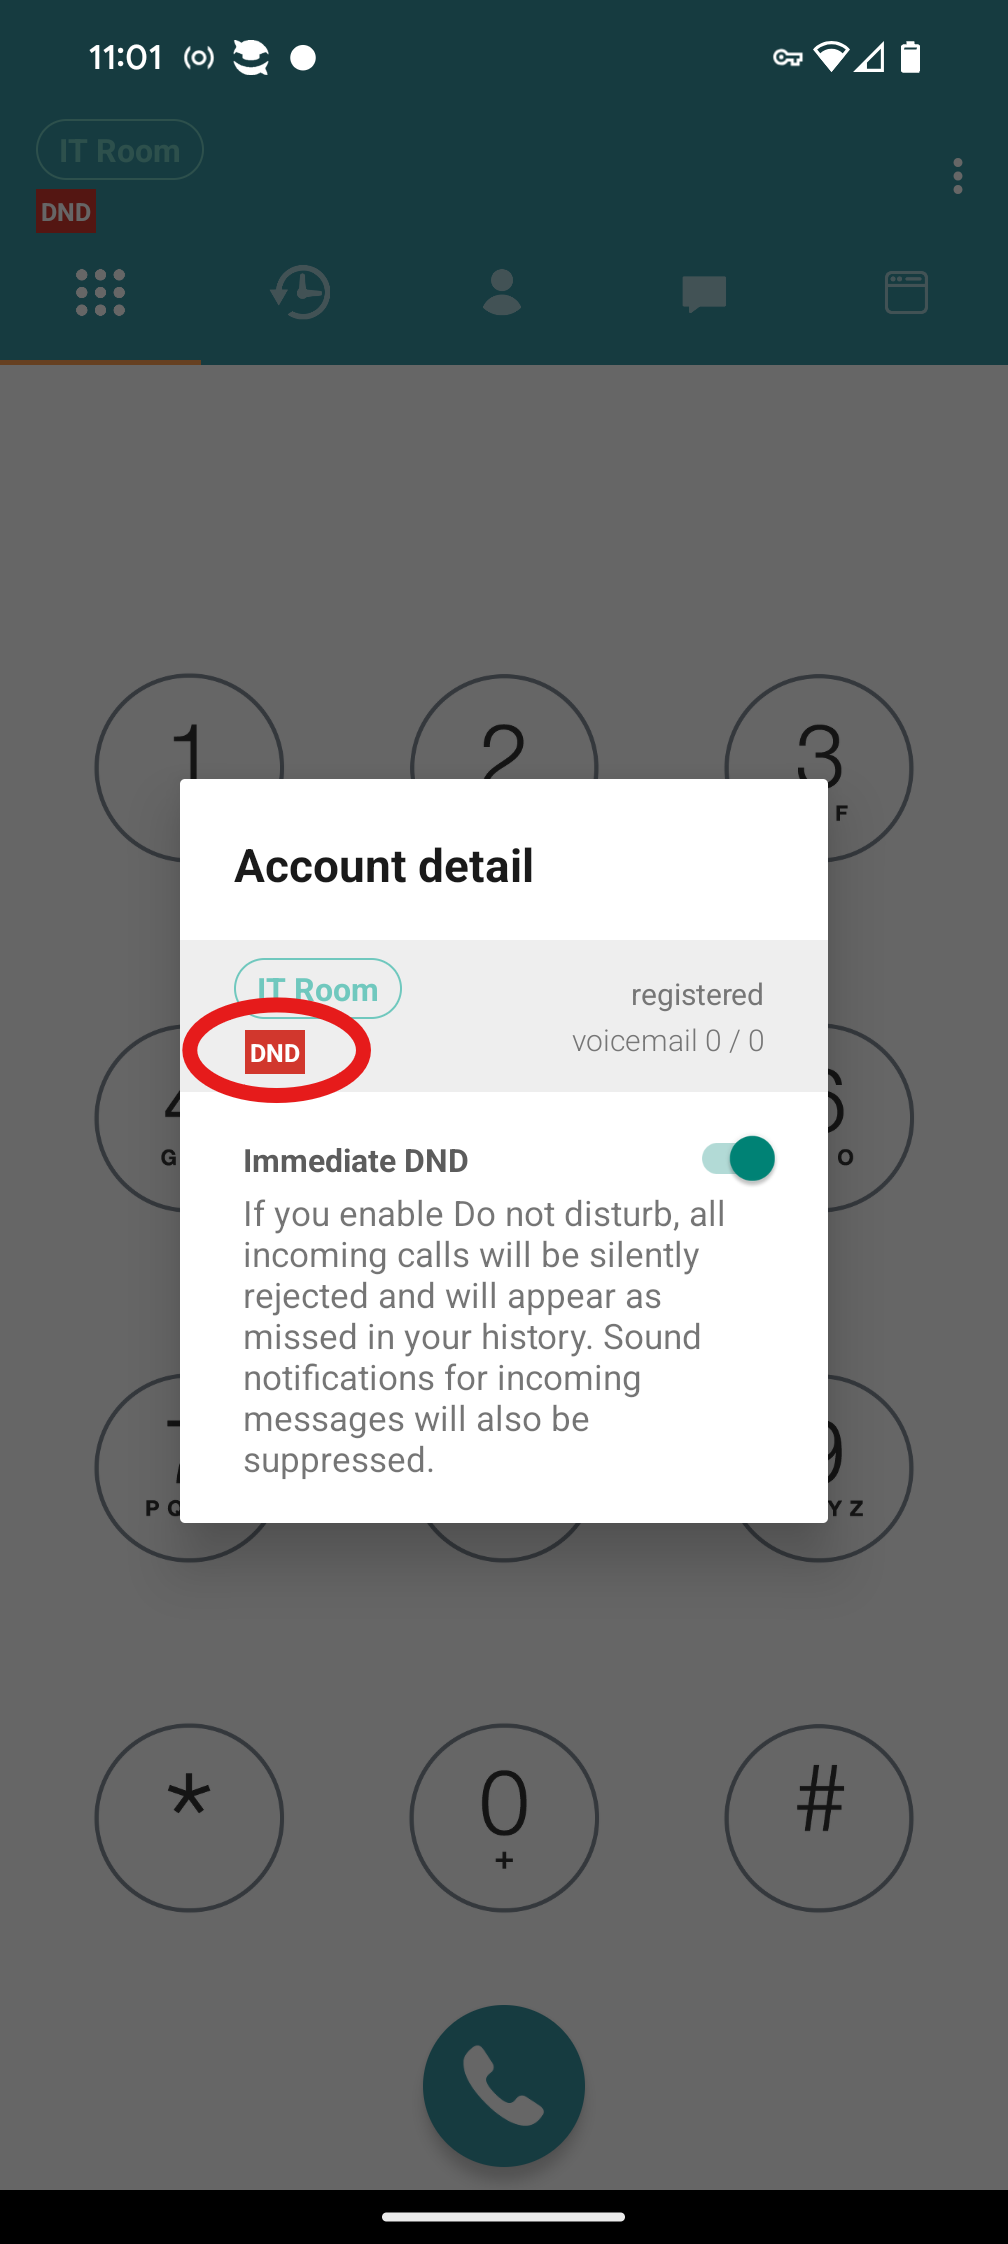
Enable DND
To prevent calls from ringing your mobile app, you can enable DND in the app. This will only affect the mobile app and does not apply DND to the rest of your devices or your extension. To enable DND for your extension/all devices, please click here.
1. Tap on your extension name in the top left

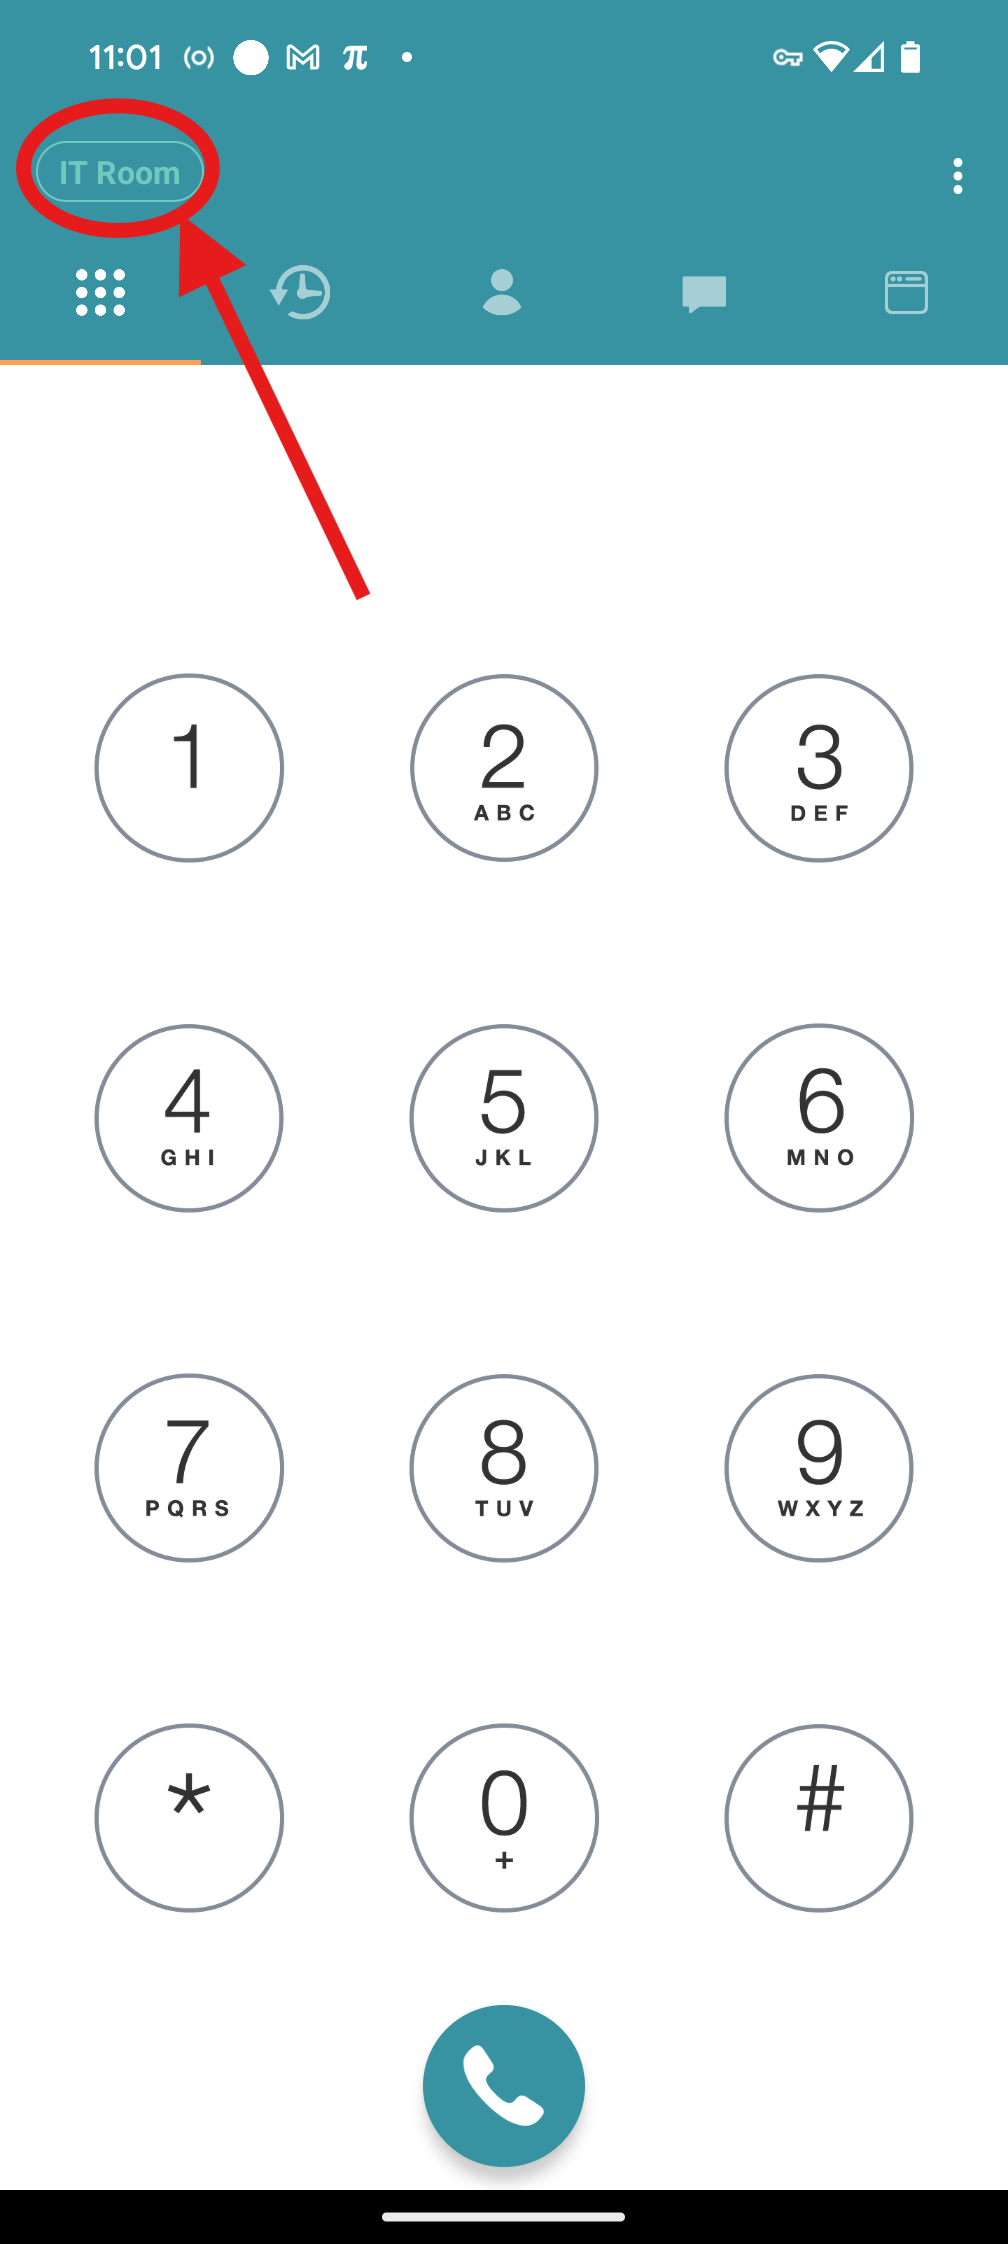
2. Tap the slider for DND to enable. This will prevent calls from ringing to your mobile app.


3. If DND is enabled, it will show a red DND box here. To disable it, tap the slider again.